Instructor Info
Daniel Kohn
Email:
dekohn@memphis.edu
Office ET218
Office Hours
Course Info
Course Policies
GradeWatch Access
Assignment Submission
Submit Assignments
Required Text
The AVR Microcontroller and Embedded Systems Using Assembly and C: Using Arduino Uno and Atmel Studio by Sarmad Naimi and Muhammad Ali Mazidi 2nd Ed
Author's Website
http://nicerland.com/
Previous Courses
TECH 3233 - Microprocessors
TECH 3812 - Digital Communications
Required Software
MicroChip Studio (Formerly Atmel Studio 7) - note: "Download Microchip Stuido button does not seem to work, scroll down to "Downloads and Documents"
Arduino IDE (Install Legacy IDE 1.8.x for avrdude utility)
Putty
Course Outline:
| Date | Topic | Reading | Handouts | Assignments |
|---|
| | | | | |
Reference Links:
New MicroChip Website
ATmega328P Datasheet (new link)
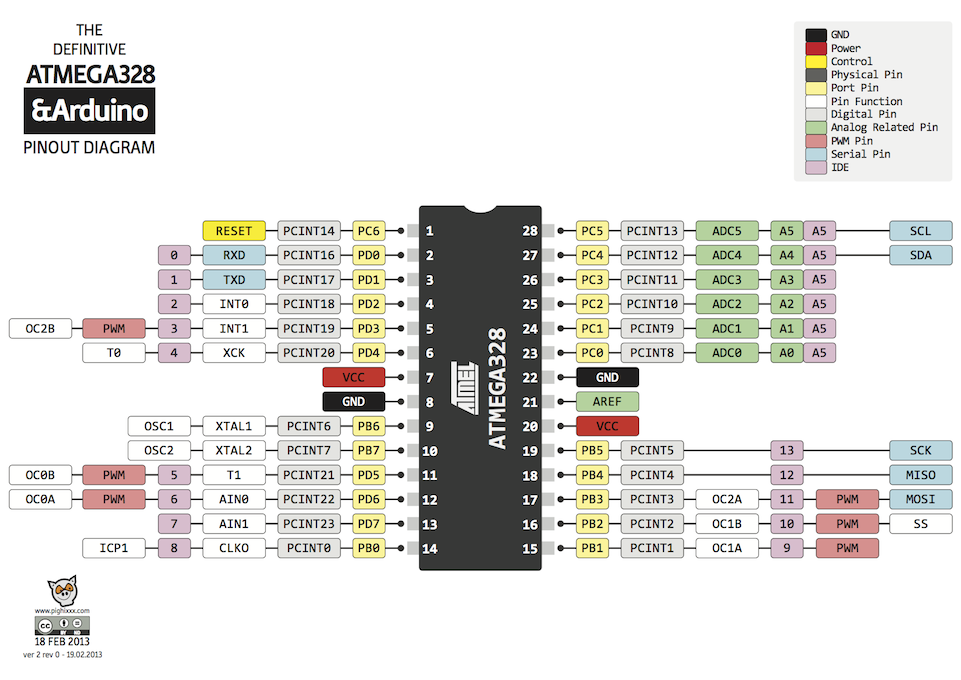
ATmega328P / Arduino pinout
C Quick Reference
Tutorialspoint C Programming
What's all this _BV() stuff
Various AVR Articles
VT100 Escape Codes
C Style Guides
Rigol Digital Oscilloscope - 2000 Series
• (note: to use USB Stick, it MUST be formatted as FAT32)
Arduino Ethernet Shield 2
WIZ5500 IC
Real Time Clock (BOB 12708)
16x2 SerLCD
ADXL345 Tripple Axis Accelerometer
Transceiver (nRF24L01+)
Wifi Module (ESP8266)
Bi-Directional Logic Level Converter
Info needed for Labs
Determine Com Port
With Arduino plugged in to computer's USB port
Win 10 - Search for "Powershell" and open
Type - "Get-WMIObject Win32_SerialPort" (no quotes)
check results for Arduino Uno (Com __ )
Atmel Studio
Setup Strings:
C:\Program Files (x86)\Arduino\hardware\tools\avr\bin\avrdude.exe
-C "C:\Program Files (x86)\Arduino\hardware\tools\avr\etc\avrdude.conf" -p atmega328p -c arduino -P COM7 -b 115200 -U flash:w:"$(ProjectDir)Debug\$(TargetName).hex":i"
Atmel Studio add ins:
Microchip Gallery
Go to above link then search for "Microchip Gallery". Click on "Download" on left side of screen and run the downloaded file (if Atmel Studio was opened when you did this, close and reopen Atmel Studio). This should now allow Atmel Studio access to plugins (TOOLS | Extensions and Updates). It is suggested in go ahead and install "Terminal for Atmel Studio"
To get printf to work with floating point values:
Project |
nameofproject Properties | Toolchain : AVR/GNU Linker | General | Check "Use vprintf library(-Wl,-u,vfprintf)"
Project |
nameofproject Properties | Toolchain : AVR/GNU Linker | Miscellaneous | Other Linker Flags put into textbox | "-lprintf_flt" (leave off quotes).
For ATmega 2560
ATmega2560 Datasheet
2nd setup string:
-C "C:\Program Files (x86)\Arduino\hardware\tools\avr\etc\avrdude.conf" -p atmega2560 -c wiring -P COM3 -b 115200 -U flash:w:"$(ProjectDir)Debug\$(TargetName).hex":i"
if you get an error that says:
avrdude.exe: Device signature = 0x1e9801 (probably m2560)
avrdude.exe: NOTE: "flash" memory has been specified, an erase cycle will be performed
To disable this feature, specify the -D option.
avrdude.exe: erasing chip
avrdude.exe: stk500v2_command(): command failed
you need to add a -D to the 2nd setup string like this:
-C "C:\Program Files (x86)\Arduino\hardware\tools\avr\etc\avrdude.conf" -p atmega2560 -c wiring -P COM3 -b 115200 -U flash:w:"$(ProjectDir)Debug\$(TargetName).hex":i"
Using Multiple Usarts:
When you start the project, pick the number of USARTS you need. In Each USART, change the mode to Async IRQ Mode and make sure you enable Printf support. You can adjust the RX and TX Buffer size to meet your needs.
at the start of you code (above atmel_start_init();) you will need to add the following line:
FILE USART_x_stream = FDEV_SETUP_STREAM(USART_x_write, USART_x_read, _FDEV_SETUP_RW);
where x is the USART number (you will need to add this line for EACH USART you wish to use 0-3).
to get characters:
fgetc(&USART_x_stream);
to print stuff, put it in an array (buffer in the example below) with sprintf then send to usart with fprintf:
sprintf(buffer,"Hello World\n\r");
fprintf(&USART_x_stream,"%s",buffer);